Hoover ovens have a number of basic and advanced cooking functions that enable you to cook a wide variety of dishes to perfection. Whether you’ve recently bought a Hoover cooker or you’ve owned one for a while, it’s worth spending time learning about each of the unique settings on your appliance.
In this guide, we’re going to cover all of the universal settings that you’ll find in any Hoover oven so you can take full advantage of your appliance. If you need further help after reading this guide, check your user manual or get in touch with the Hoover customer support team directly for specialist advice.
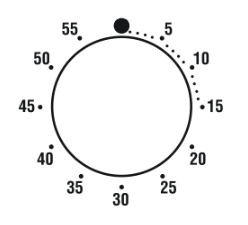
Minute Timer

The minute timer is a selection knob that you can use to set the cooking time. When the time has elapsed, the appliance will make an audible ring for a few seconds.
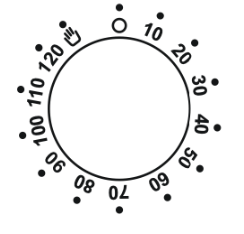
End of Cooking Time

The end of the cooking time selection knob enables you to choose the total cooking time on the oven. After the selected time, the oven will automatically switch off. There will be a timer that counts down from the set cooking time until all of the time has elapsed.
Functions
There are a number of functions in every Hoover cooker and this guide will cover the most common ones, so you can make the most of your oven.
Minute Minder

Overview – The minute minder enables you to set a timer so that the alarm on the cooker sounds when the cooking process is complete. When you set the timer, the display screen shows the remaining time left.
Best used for – Setting an alarm on the cooker.
Benefits/drawbacks – The minute minder warns you when your food has finished cooking, so you don’t need to stay in the room waiting for it. You might not need to use it, but it’s a handy feature to have.
Manual Function

Overview – The manual function symbol is shown by the word ‘Man,’ and it enables you to operate the oven.
Best used for – Operating your Hoover oven.
Benefits/drawbacks – There are no particular benefits or drawbacks to the manual function. It’s a necessary feature that enables you to use your cooker.
Cooking Time

Overview – The cooking time symbol denotes an arrow with parallel lines at either end. This setting enables you to set the cooking time for a particular dish.
Best used for – Selecting the total cooking time for a dish.
Benefits/drawbacks – Being able to choose the total cooking time is an essential feature for any oven, and it enables you to choose the right time to cook your dishes to perfection. There are no drawbacks to this setting.
End of Cooking

Overview – The end-of-cooking function is very similar to the cooking time function but allows you to set the end cooking time. You can check the preset time by pressing the button down three times. You can then modify the end of cooking time using the up and down arrows.
Best used for – Selecting the end of cooking time.
Benefits/drawbacks – It’s helpful to be able to set your end cooking time so that you can plan your schedule a little more easily. For example, if you set the end cooking time to be at 6 pm, you can get on with some house chores or work until this time without needing to worry about your dinner burning. Your appliance will sound an alarm when the cooking time is complete. Be careful not to use the end-of-cooking setting without actually setting an end time, as the oven will start cooking immediately if this is the case.
Child Lock

Overview – Most modern-day household appliances have a child lock, and ovens are no different. The child lock is shown by an image of a padlock, and when active, it disables all of the buttons on the oven so your child can’t press them.
Best used for – Preventing your child from turning the oven on or adjusting the setting.
Benefits/drawbacks – The child lock is a safety mechanism on all Hoover ovens, and it keeps your child safe from harm and reduces the risk of damage to your appliance. It’s easy to activate, but you’ll need to remember to deactivate it when you want to use your cooker again.
Function Dial
You’ll use the function dial to select a particular cooking programme on your electric oven, depending on what type of dish you’re cooking. To select a specific programme, all you need to do is turn the selection knob to the appropriate symbol. Keep reading to learn about each of the function symbols on a standard Hoover oven.
Light

Overview – Every modern-day oven has a lamp that illuminates the inner compartment of the oven. This function is shown by an image of a light. When the light is turned on, it also activates the cooling fan (only if your oven is a fan model).
Best used for – Turning on or off the light inside your oven.
Benefits/drawbacks – The lamp is helpful to have inside your oven so that you can see your food while it’s cooking and determine whether or not it’s ready to get out. The drawback is that leaving the lamp on during the cooking process will increase your appliance’s electricity usage.
Defrosting

Overview – When you choose the defrost setting, which is shown by an image of a snowflake and a water droplet, the fan circulates warm air around the food inside the oven. This air will slowly defrost the ingredients before you start cooking them.
Best used for – Defrosting your food.
Benefits/drawbacks – The defrost setting maintains the nutrient content of your food while warming it up. It enables you to thaw your food more quickly than if you’d simply left it out on the kitchen countertop, so you can get on with your cooking. Because of the fan motion used in the defrost setting, the appliance will use a small amount of electric energy to defrost your food.
Natural Convection

Overview – The natural convection cooking setting uses both the top and bottom heating elements. It’s denoted by a symbol of a square with black lines at the top and bottom of it.
Best used for – Traditional baking and roasting.
Benefits/drawbacks – You can cook or bake a wide variety of dishes with this programme. It’s suitable for meats, tofu, vegetables, cakes, and biscuits. It’s a powerful setting due to using heating elements from above, and below, so you’ll need to be careful not to burn your food.
Fan Cooking

Overview – The fan cooking setting is very similar to the natural convection programme in that it uses both the top and bottom heating elements inside the oven. The difference is that the fan cooking setting circulates hot air around the oven’s inner compartment to speed up the cooking process.
Best used for – Cooking poultry, pastries, vegetables, and fish.
Benefits/drawbacks – The fan cooking programme circulates air to cook your food evenly. This setting offers an efficient method of cooking as the fan circulation reduces the total cooking time. Your appliance will use a small amount of extra energy when the fan is activated compared to when you’re using a non-fan cooking mode.
Fan Plus Lower Element

Overview – The fan plus lower element cooking programme uses an additional lower heating element. You’ll find this setting by searching for the symbol of a fan with a solid black line underneath it.
Best used for – Cooking delicate dishes, like pies, quiches, and souffles.
Benefits/drawbacks – This setting enables you to cook dishes that would normally burn quite easily without overcooking them. You’ll love this setting if you cook pastry-based pies and egg-based dishes regularly but you might never need it if you don’t often choose to cook these dishes.
Grill

Overview – The grill programme is a standard and universal setting that you’ll find in every electric oven. It’s shown by an image of a black square with a jagged line at the top of it, and it uses the top heating element only.
Best used for – Grilling poultry, red meat, kebabs, and gratin dishes.
Benefits/drawbacks – The grill setting enables you to get a crispy top crust on your dishes. However, because it’s so powerful, you’ll need to make sure you use the correct grill temperature to avoid burning the top of your food. You’ll need to keep the oven door closed when using the grill.
Fan Assisted Grill

Overview – The fan-assisted grill is very similar to the grill programme but the fan is also activated with the setting. The fan circulates hot air around the inside of the oven to speed up the cooking process. The symbol for this setting is an image of a fan with a jagged line above it.
Best used for – Efficiently grilling large joints and roasts.
Benefits/drawbacks – The fan-assisted grill is an extra powerful grill setting that is highly efficient at cooking large volumes of food. You should avoid placing your food too close to the grill because it will burn your food. You’ll also need to turn the food over halfway through the cooking process to ensure even cooking.
Grill/Spit Element

Overview – The grill/spit element is shown by a jagged line with a flat-headed arrow below it. This setting is present in most Hoover cookers.
Best used for – Roasting meat-based dishes on the spit.
Benefits/drawbacks – This programme is ideal if you want to roast on the spit, but you might never use it if you rarely eat meat.
Function Pizza

Overview – The function pizza programme is denoted by a symbol of a pizza. Hot air circulates around the oven to ensure even cooking across the whole pizza.
Best used for – Cooking pizza or focaccia bread.
Benefits/drawbacks – For the pizza lovers out there, the function pizza programme is a lifesaver. You’ll never have to worry about burning the crust or base of your pizza ever again, thanks to the even cooking process offered by this cooking set. The downside to this setting is that it’s only good for cooking pizzas and focaccia bread, so you probably won’t use it as much as the other cooking programs in your oven.
