When you want to learn more about how your Hotpoint oven works, your first point of call is probably going to be your user manual. You search your drawers and cupboards to find it, but it’s nowhere to be seen.
Without the user manual, it can be difficult to know what every symbol means, and you may not be able to make the most of the unique settings that your Hotpoint oven offers.
But don’t panic! This guide will cover all of the key symbols and features that you’ll find in your Hotpoint oven. While every model is slightly different and offers unique features, many settings are universal across all Hotpoint ovens.
We’re going to cover the universal symbols so that you can make the most of your Hotpoint oven and cook your meals to perfection.
Control Panel Symbols
The control panel enables you to control the basic functions of your oven, including the light inside the oven compartment, the timer, and the thermostat. It usually comprises a display screen and either knobs or buttons that enable you to adjust your oven’s settings.
Selection Knob
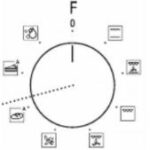
Overview – Most Hotpoint ovens have a selection knob that enables you to switch the oven to a specific cooking function.
Best used for – Selecting a specific cooking function on your appliance.
Benefits/drawbacks – The selection knob enables you to choose the right cooking function, but as it is a knob and not buttons, it’s quite easy to accidentally select the wrong function by turning the knob too far to the left or right.
Light

Overview – The light symbol is shown by an image of a lightbulb. It’s a basic function that you’ll find in all Hotpoint electric oven models.
Best used for – Switching on the light inside the oven compartment lamp when cooking.
Benefits/drawbacks – The light enables you to see clearly inside the oven compartment so you can monitor the progress of your cooking and determine whether your food is ready or not. When the light is turned on, your appliance will use more electricity, which is a drawback if you’re trying to reduce energy usage in your home.
Timer

Overview – The timer symbol is denoted by a clock and it enables you to change the time settings in your Hotpoint oven and set a timer when you’re cooking.
Best used for – Adjusting the cooking time and starting a timer when you’re cooking to prevent you from overcooking your food.
Benefits/drawbacks – The timer is ideal when you want to set your dinner to cook while getting on with your house chores or relaxing in front of the TV. The oven will beep to inform you of when your dinner is ready, so it won’t get burnt. There aren’t really any major downsides of the timer function, aside from the fact that you might never use it.
Adjustment Buttons

Overview – The adjustment buttons enable you to change the cooking settings using the [+] or [-] buttons.
Best used for – Adjusting the cooking settings in your electric oven.
Benefits/drawbacks – Because they are buttons, as opposed to knobs, you can select the precise setting you want. Again, there aren’t any drawbacks to the adjustment buttons. They offer an essential function that you will probably use every time you turn on your Hotpoint oven.
Thermostat

Overview – The thermostat comprises a turning knob with a range of temperatures around it, and it enables you to select a cooking temperature.
Best used for – Selecting a cooking temperature.
Benefits/drawbacks – The thermostat is a simple knob that makes it easy to select the right temperature for each dish. However, because it’s a knob, instead of buttons, it’s easy to accidentally turn it too far and either undercook or overcook your food.
Off Setting

Overview – The off setting, sometimes called the zero setting, is shown by the number 0. It’s displayed when the oven is turned off, either by the power button or at the main plug socket.
Best used for – When the oven is turned off.
Benefits/drawbacks – It’s helpful to have a symbol to show when the oven is off. However, if the reason why it’s not turned on is because of a fault with your appliance, the symbol will look the same, so you may not realise that there is a fault until you try using your oven.
Cooking Function Symbols
Hotpoint ovens have several functions, each of which is best for cooking certain dishes in particular ways. Being aware of what each function does ensures that you can choose the perfect oven settings for your dishes.
Bread Auto
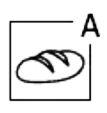
Overview – The bread auto symbol shows a loaf of bread with a capital A in the corner, and it’s used for baking bread.
Best used for – Selecting the ideal temperature and time for baking bread.
Benefits/drawbacks – This is a great function to have on your oven if you’re a keen baker and you enjoy making fresh bread at home. You’ll need to activate this function when the oven is cold. The drawback is that you might never use this function if you don’t bake your own bread.
Conventional
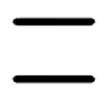
Overview – The conventional oven symbol is shown by two straight, parallel lines, and it’s a basic cooking function that most people will use frequently.
Best used for – For cooking all kinds of dishes on one shelf only.
Benefits/drawbacks – You’ll probably use the conventional cooking function more than any of the others because it’s suitable for pretty much any dish. However, if you want a more specialised cooking setting, this one might not be the best option and you can only use one shelf at a time with the conventional function.
Convection Bake
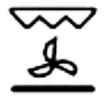
Overview – You’ll spot the convection bake symbol denoted as a jagged shape, a fan just below it, and a solid black line at the bottom. This setting differs from standard bake settings as it has an air circulation that distributes air more evenly around the oven compartment.
Best used for – Cooking your dishes evenly and efficiently.
Benefits/drawbacks – This function enables you to cook your food evenly, and it’s suitable for a range of dishes. Ideally, you should use no more than two shelves at a time with this setting, and you’ll need to swap the positions of each baking tray halfway through the cooking process for the best effects.
Defrost Fan Setting

Overview – The defrost setting is denoted by a fan with a water droplet underneath it, and it’s used when you’re defrosting food.
Best used for – Defrosting your ingredients quickly before cooking.
Benefits/drawbacks – This setting is great when you need to thaw out your ingredients, and you don’t have time to wait for them to defrost naturally. However, you’ll need to place your food in wrapping when defrosting using this setting in your Hotpoint oven to prevent it from drying out.
Desserts Auto
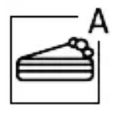
Overview – The desserts auto symbol shows a cake with a capital A in the upper right corner. It’s used to set the right time and temperature for baking desserts.
Best used for – Baking desserts of all kinds, but particularly for cakes. Activate this function when the oven is cold.
Benefits/drawbacks – This is a helpful function if you regularly bake cakes and sweet treats. However, most people may rarely (or never) use this particular setting.
Diamond Clean

Overview – You can activate the diamond clean function by selecting the button that is symbolised by a shiny water droplet. This setting enables you to clean the inside of your oven using steam.
Best used for – Cleaning your oven and removing food residues from the bottom of the oven. It should be activated when the oven is still cold.
Benefits/drawbacks – The diamond clean function saves you from manually cleaning the inside of your oven, which can be a laborious and time-consuming task. There isn’t a drawback to this setting, and it’s something that the majority of Hotpoint oven users will enjoy and appreciate.
Eco Convection Bake

Overview – The eco convection bake setting is very similar to the convention bake setting, and it’s denoted by a fan with a lowercase e next to it. When this function is in use, the light inside the oven compartment will remain off.
Best used for – Roasting roasts and large joints of meat, where you don’t want the food to dry out while in the cooker.
Benefits/drawbacks – This setting is great for preventing your food from drying out too quickly as it gently and intermittently circulates air around the oven. The light automatically turns off when you select this function, so you need to manually turn it back on if you want to monitor your food during the cooking process.
Grill
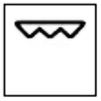
Overview – The symbol for the grill set is a jagged shape, and this function is found in almost every Hotpoint oven.
Best used for – Cooking steaks, sausages, and vegetables. You can also use it for toasting bread.
Benefits/drawbacks – The grill function is highly versatile, and you can use it for a wide range of meat-based or plant-based dishes. There are no major drawbacks to using this function, but you’ll need to make sure that you select the right temperature setting to avoid burning the top of your food.
Turbo Grill
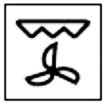
Overview – Turbo grill is shown by a jagged shape with a fan underneath it. This setting isn’t present in every Hotpoint fan oven and advanced grill symbols are usually only in the newer, pricier models.
Best used for – Roasting large joints of meat.
Benefits/drawbacks – This is a handy option to have when you’re cooking large joints for several people, such as if you’re hosting a family dinner or a dinner party for your friends. The downside is that you might never need to use this function, especially if you follow a vegetarian or vegan diet.
Symbols Rubbed Off/Worn Off
The more you use your Hotpoint oven, the quicker the symbols can rub off. Although the symbols are built to withstand wear and tear, they won’t last forever, and after decades of using your appliance, you might no longer be able to see them at all.
If your symbols have worn off, you can either use a permanent marker to draw them back on yourself or purchase pre-made stickers to replace the old symbols. This will enable you to remember where each symbol is, and which button relates to which function in your Hotpoint fan oven.
